Application Manager
Admin - Document Applications Manager
1. Overview
This page is designed for administrators to manage various document applications submitted by students, such as Bonafide Certificates and Passport-related requests. It provides tools to search, filter, view, and process these applications efficiently.
2. Accessing the Page
This administrative page is typically accessed through the main Admin Dashboard or navigation menu, often under a section related to 'Applications', 'Student Documents', or 'Requests'.
3. Page Layout and Features
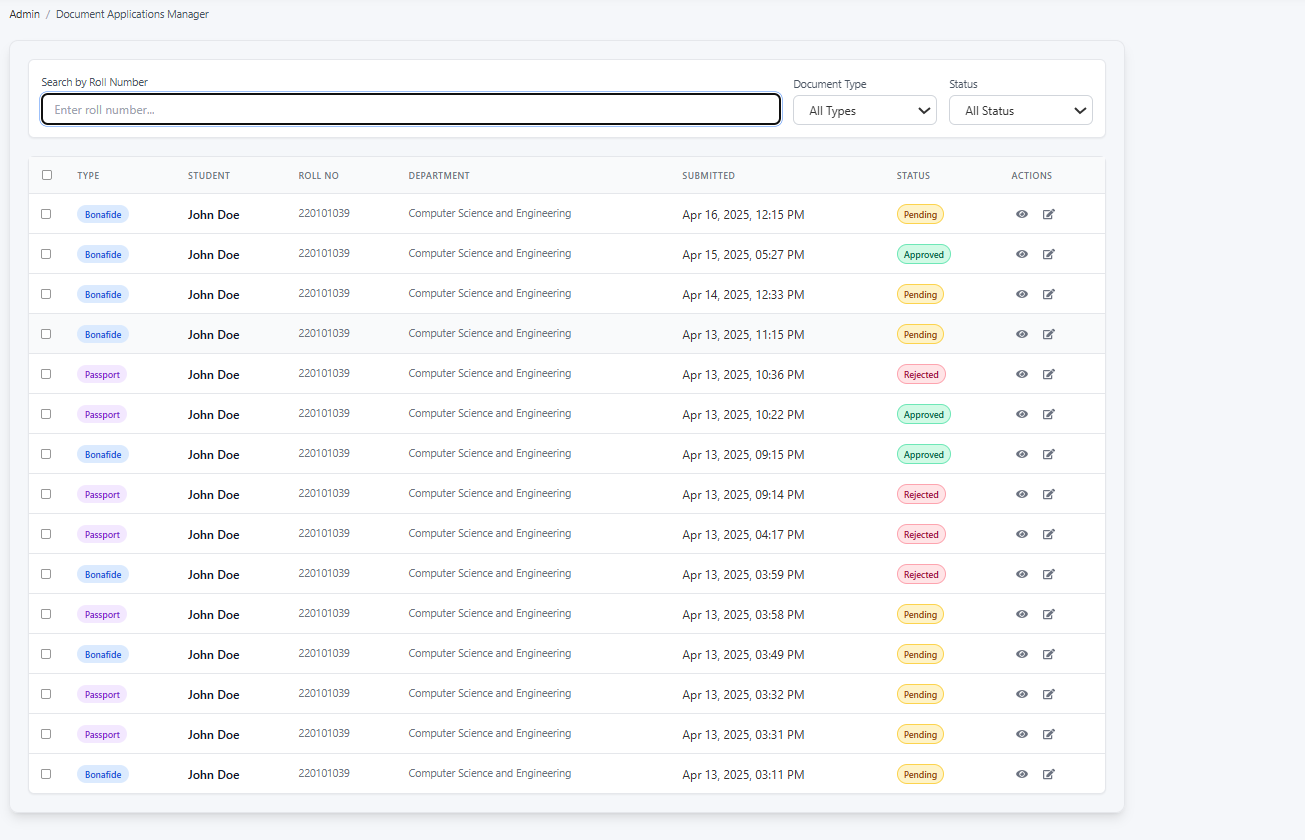
The page consists of two main sections: Filtering/Search controls and the Application List table.
- Breadcrumbs: (e.g.,
Admin / Document Applications Manager) Shows your current location within the admin portal. - Filtering and Search Bar: Located at the top, this allows you to narrow down the list of applications:
Search by Roll Number: Enter a specific student's roll number into this field and press Enter (or wait for auto-update) to find all applications submitted by that student.Document TypeDropdown: Filter applications based on the type of document requested. Options typically include:All Types(Default): Shows applications for all document types.Bonafide: Shows only Bonafide certificate applications.Passport: Shows only Passport-related applications.- (Other types may be available)
StatusDropdown: Filter applications based on their current processing status. Options typically include:All Status(Default): Shows applications regardless of their status.Pending: Shows applications awaiting review.Approved: Shows applications that have been approved.Rejected: Shows applications that have been rejected.
- Application List Table: Displays the filtered list of document applications with the following columns:
- Checkbox: Allows selecting individual or multiple applications (potentially for bulk actions, though specific bulk action buttons are not visible in the screenshot).
TYPE: The type of document requested (e.g.,Bonafide,Passport), often displayed with a distinct colored tag.STUDENT: The name of the student who submitted the application.ROLL NO: The unique roll number of the student applicant.DEPARTMENT: The academic department associated with the student.SUBMITTED: The date and time the application was submitted by the student.STATUS: The current processing status (Pending,Approved,Rejected), usually indicated by a colored tag corresponding to the status.ACTIONS: Provides icons to interact with each individual application:- View Icon (Eye): Click this to view the full details of the specific application (e.g., purpose stated by the student, any uploaded supporting documents, history of the request).
- Edit/Process Icon (Pencil/Square with Arrow): Click this to take action on the application. This typically opens a modal or separate page where you can change the status (e.g., from
PendingtoApprovedorRejected), add comments or rejection reasons, and save the changes.
4. How to Use This Page
- Navigate to the
Document Applications Managerpage within the admin portal. - Filter/Search (Optional):
- To find applications from a specific student, enter their
Roll Numberin the search box. - To view only a specific type of application (e.g.,
Bonafide), select it from theDocument Typedropdown. - To view applications with a specific status (e.g.,
Pending), select it from theStatusdropdown. - You can combine these filters (e.g., show all
PendingBonafideapplications). The table will update automatically or after pressing Enter in the search field.
- To find applications from a specific student, enter their
- Review Applications: Browse the filtered list in the table. Check the
SUBMITTEDdate,STUDENTdetails, and currentSTATUS. -
Process an Application:
- Identify an application needing action (usually one with
Pendingstatus). - Click the View Icon (Eye) in the
ACTIONScolumn to review the application details thoroughly. - After reviewing, click the Edit/Process Icon (Pencil/Square with Arrow) for that application.
-

-
In the editing view/modal:
- Change the
StatustoApprovedorRejectedas appropriate. - If rejecting, provide clear reasons in the designated comments/remarks field. You might also add comments upon approval.
- Save the changes.
- Change the
- The
STATUSin the table for that application will update accordingly.
- Identify an application needing action (usually one with
5. Typical Workflow (Example: Processing Pending Bonafide Requests)
- Go to the
Document Applications Managerpage. - Select
Bonafidefrom theDocument Typedropdown. - Select
Pendingfrom theStatusdropdown. - The table now lists all pending Bonafide certificate requests.
- For each request:
- Click the View Icon to check the student's details and purpose.
- Click the Edit/Process Icon.
- Update the status to
ApprovedorRejected. - Add remarks if necessary (especially for rejections).
- Save.
- Repeat until all relevant pending requests are processed.
6. Important Notes
- Ensure you have the necessary administrative permissions to view and modify application statuses.
- Be precise when adding rejection reasons, as students will likely see these comments to understand why their request was denied.
- Changes made here directly affect what the student sees in their application status history.